This article aims to present the steps to create the most basic remote controlled robot which is used in several robotics competitions.

Parts:-
The parts required for building this robot are:-
- Chassis (For body to the robot)
- DC Geared Motor (min. 100 rpm) - 4
- Wheels - 4
- DPDT(Joystick) Switch-2
- General Purpose PCB-1
- Ribbon wire or 6 core wire - 3meter or above
- Connecting wires
- Soldering wire and Soldering Iron
- Screw Driver
- Spanner
- Wire Stripper
1. Assemble the mechanical parts:
Fix the motors in the holes provided on the chassis and couple the wheels with each motor. (refer the following figures)


2. Creating remote:-
Before creating the remote we have to learn basic movements of robot which is shown in the following table:-

(NOTE:- The left and right referred above is for
the Chassis Upside Down)
To make anti-clockwise motion of motor, the polarity of supply must be inverted of polarity of supply in clockwise motion. For "Polarity Reversal" DPDT Switches are generally used. This can be done by using following circuit.
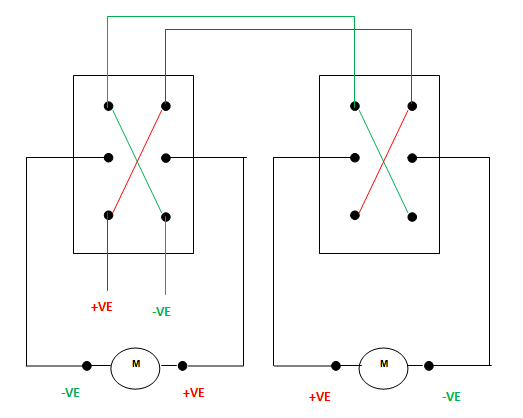
- The number of "poles" is the number of separate circuits which are controlled by a switch.
- The number of "throws" is the number of separate positions that the switch can adopt.


Now connections:-
- Mount both the DPDT Switches on PCB.
- As you can see each switch has 8 legs:- 4 on each side. For each side of a switch, solder the 2 legs in the middle (i.e. make a short b/w them).
- Now make the connections as per the above figure. Please note for connections with the motor use ribbon or 6 core wire and for other connections you can any other wire(I would prefer thin single strand wires).
- After these connections, the remote will have 4 outputs lines (for motors) and 2 input lines (for power supply).
- Carefully make series connection between two motor for each side (left or right).
- Now connect the 4 outputs with the motors such left switch is connected to left motors and right switch is connected to the right motor.
4. Power Supply:-
For Power supply you can use the rechargeable battery of rating 9 volts and 4.5 amperes or else i would prefer you to use power adapter which is used for charging the laptops (rating 18V-20V or 60W - 90W) because it gives constant voltage and required speed for your robo car.
Speed of Robot:-
Speed of Robot:-
Speed of robot can be calculate by following formula-
Velocity = circumference * rpmHere, the circumference of the wheel is to be taken.
The RPM of motor will perfect match with its specification if only is power rating of motor is provide by power supply.
Velocity = circumference * rpmHere, the circumference of the wheel is to be taken.
The RPM of motor will perfect match with its specification if only is power rating of motor is provide by power supply.
(NOTE:- You can also make this robot by using 2 motors and a castor wheel but this will reduce the stability of car in fast tracks during a race.)
awesome !!! my school's science fest will be awesome with this...
ReplyDeleteDo you have video for making this rc car (step by step)?
ReplyDeleteRaahi I have not yet created the video for it but will do it soon
ReplyDelete